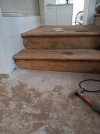
Nice place!! That age of staircase pulls apart real easy if you want to get into the stringers. The balusters are probably notched into the treads. There's a cap piece on the end of the treads. Remove it first and it will expose the side of the baluster. Usually just pull it out. May be a small trim nail, but usually won't. Balusters should just drop out of the rail after you pull the bottom from the tread. Might want to number those..good idea to number everything. That opens the end of the tread. That's where I start working a pry bar and wedges to lift the tread. Won't beat up any edges that will show and lifting with the grain will keep you from snapping it. I pull all nails through rather than pulling them. Liquid nail as much as possible putting it back together. Good luck! I wouldn't sweat it.this is just one I pulled from Zillow. I can take more tomorrow. If you zoom to the very lower left, you can see the gaps in the trim from the bottom settling. That landing at the top is solid.
In case you can’t tell, it’s not a spiral staircase.

No forums found...
Site Related
Iowa State
College Sports
General - Non ISU
CF Archive
Install the app
Woodworkers Thread
- Thread starter AgronAlum
- Start date
No forums found...
Site Related
Iowa State
College Sports
General - Non ISU
CF Archive
You are using an out of date browser. It may not display this or other websites correctly.
You should upgrade or use an alternative browser.
You should upgrade or use an alternative browser.

How would I go about getting it all tight again? I'm guessing the open end stringer needs to move toward the wall, since some of those treads have pulled out from the wall stringer? Would you try and make some shims or blocking at the bottom to bring it back up again? Or just let that be and get everything tight?Nice place!! That age of staircase pulls apart real easy if you want to get into the stringers. The balusters are probably notched into the treads. There's a cap piece on the end of the treads. Remove it first and it will expose the side of the baluster. Usually just pull it out. May be a small trim nail, but usually won't. Balusters should just drop out of the rail after you pull the bottom from the tread. Might want to number those..good idea to number everything. That opens the end of the tread. That's where I start working a pry bar and wedges to lift the tread. Won't beat up any edges that will show and lifting with the grain will keep you from snapping it. I pull all nails through rather than pulling them. Liquid nail as much as possible putting it back together. Good luck! I wouldn't sweat it.
You might be able to crank the entire stringer up once you take off the bottom tread. If not shimming would be your best bet. Having the same issue with the stairs I'm doing right now. Throws the bottom riser height off a bit, but not much you can do unless you want to level everything.How would I go about getting it all tight again? I'm guessing the open end stringer needs to move toward the wall, since some of those treads have pulled out from the wall stringer? Would you try and make some shims or blocking at the bottom to bring it back up again? Or just let that be and get everything tight?
Depends on what's going on with the stringers. Is it just shifting? If you end up shimming things get the composite shims, they don't compress and use subfloor adhesive to keep it from coming loose.How would I go about getting it all tight again? I'm guessing the open end stringer needs to move toward the wall, since some of those treads have pulled out from the wall stringer? Would you try and make some shims or blocking at the bottom to bring it back up again? Or just let that be and get everything tight?
The gaps in the trim at the top of the stairs (where the landing is) and the gap between the wall stringer and the wall trim lead me to believe the bottom of the stairs settled with the foundation at some point. It also may have shifted "forward" toward the bottom of the stairs, if that makes sense.Depends on what's going on with the stringers. Is it just shifting? If you end up shimming things get the composite shims, they don't compress and use subfloor adhesive to keep it from coming loose.
I've checked a few treads and they appear decently level, but it's possible they were leveled after the settlement.
Ultimately, my goal is to tighten everything up: remove the screws from treads (put there by ignorant owners) and eliminate loose treads/squeaking so the stairs are not so noisy. I also want to close or fill in the gaps in the trim as they are an eyesore.
Are you just looking to reuse all the old wood? Might have a hard time getting it all tight again without some new pieces.The gaps in the trim at the top of the stairs (where the landing is) and the gap between the wall stringer and the wall trim lead me to believe the bottom of the stairs settled with the foundation at some point. It also may have shifted "forward" toward the bottom of the stairs, if that makes sense.
I've checked a few treads and they appear decently level, but it's possible they were leveled after the settlement.
Ultimately, my goal is to tighten everything up: remove the screws from treads (put there by ignorant owners) and eliminate loose treads/squeaking so the stairs are not so noisy. I also want to close or fill in the gaps in the trim as they are an eyesore.
Edit: Glue everything. Try and get any of the old glue off the joints before you reapply.
Yes - with it being all original, I'd like to keep it that way. I imagine it would be really hard to match it, aesthetically, and I want to keep as much of the original wood intact, if I can.Are you just looking to reuse all the old wood? Might have a hard time getting it all tight again without some new pieces.
The gaps in the trim at the top of the stairs (where the landing is) and the gap between the wall stringer and the wall trim lead me to believe the bottom of the stairs settled with the foundation at some point. It also may have shifted "forward" toward the bottom of the stairs, if that makes sense.
I've checked a few treads and they appear decently level, but it's possible they were leveled after the settlement.
Ultimately, my goal is to tighten everything up: remove the screws from treads (put there by ignorant owners) and eliminate loose treads/squeaking so the stairs are not so noisy. I also want to close or fill in the gaps in the trim as they are an eyesore.
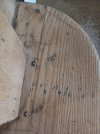
Running into the same stuff you're describing. You can see where someone tried to lift the front of the tread and broke it. Tried to lift the landing, but it didn't budge so removing the treads and shimming it. Finishing up some tile work today, and will be hitting the stairs tomorrow. I'll take some pics as I go.The gaps in the trim at the top of the stairs (where the landing is) and the gap between the wall stringer and the wall trim lead me to believe the bottom of the stairs settled with the foundation at some point. It also may have shifted "forward" toward the bottom of the stairs, if that makes sense.
I've checked a few treads and they appear decently level, but it's possible they were leveled after the settlement.
Ultimately, my goal is to tighten everything up: remove the screws from treads (put there by ignorant owners) and eliminate loose treads/squeaking so the stairs are not so noisy. I also want to close or fill in the gaps in the trim as they are an eyesore.
Attachments
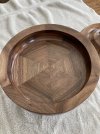
Usually reserved for the winter months I spent some time in my woodworking shop when it was just too hot this summer. Found this decorative plate on YouTube and decided to see if I could replicate it. The most extensive skill needed was patience. A 1976 model Craftsman table saw and similar vintage lathe did the trick. Only regret is not buying stock in Titebond glue before I started
Attachments

Very nice. Did you do any special prep before glue up? I'm guessing running those through a joiner was out of the question.Usually reserved for the winter months I spent some time in my woodworking shop when it was just too hot this summer. Found this decorative plate on YouTube and decided to see if I could replicate it. The most extensive skill needed was patience. A 1976 model Craftsman table saw and similar vintage lathe did the trick. Only regret is not buying stock in Titebond glue before I started
Thank you. The pieces were cut to size on the table saw then run through a thickness sander before cutting the angle/length. Each piece was cut individually rather than cutting similar sized pieces in a jig to make tighter fitting joints (I get pretty anal about some things). The picture doesn't show the contrast well but the faces you see looking at the dish from the right are walnut and the faces looking from the left are mohagany. The background is purple heart.


I love it when this thread shows up in my “not read”! Thanks to all you talented folks for sharing photos of your awesome stuff.


Since the original post in this thread asked us to share past projects I’ll include some more plates:
Nice work. I wish I had the patience to do stuff like this.
Thank you, I've always enjoyed your posts as well as others that have shared their work. I routinely get compliments on my work but I respond with the fact that I really don't have more skill than the next person, but I may have more patience than them, and I still can find room for improvement that others don't see. I also have the luxury of heating my shop with a woodburner so even my mistakes are put to use LOLNice work. I wish I had the patience to do stuff like this.
Good god.... those are amazing.Since the original post in this thread asked us to share past projects I’ll include some more plates:
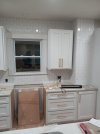
I like that.Went vertical on subway tile for the first time. I like the look.
I've done backsplash a few time (and some shiplap) in kitchens but never quite like that. Every time I've ever done something like that those, the two little spots noted below can always go **** themselves. They are almost always such a little pain in the ass.

this is just one I pulled from Zillow. I can take more tomorrow. If you zoom to the very lower left, you can see the gaps in the trim from the bottom settling. That landing at the top is solid.
In case you can’t tell, it’s not a spiral staircase.
That is incredibly pretty. Congrats!