The personal satisfaction of doing a project like this yourself will never leave you. There are those out there that say they can make more doing what they are good at and apply those earnings toward hiring someone who is more capable to do a task that they are not familiar with and be ahead of the game, and in cases rightfully so, but it is so satisfying when you do it yourself.

No forums found...
Site Related
Iowa State
College Sports
General - Non ISU
CF Archive
Install the app
Woodworkers Thread
- Thread starter AgronAlum
- Start date
No forums found...
Site Related
Iowa State
College Sports
General - Non ISU
CF Archive
You are using an out of date browser. It may not display this or other websites correctly.
You should upgrade or use an alternative browser.
You should upgrade or use an alternative browser.
Please explain the clips like I'm 5 years old.Self leveling clips make laying tile so easy. Threw the floor down by the subway kitchen today, and most the balusters sanded and refinished. Post pics on the staircase tomorrow.
Please explain the clips like I'm 5 years old.
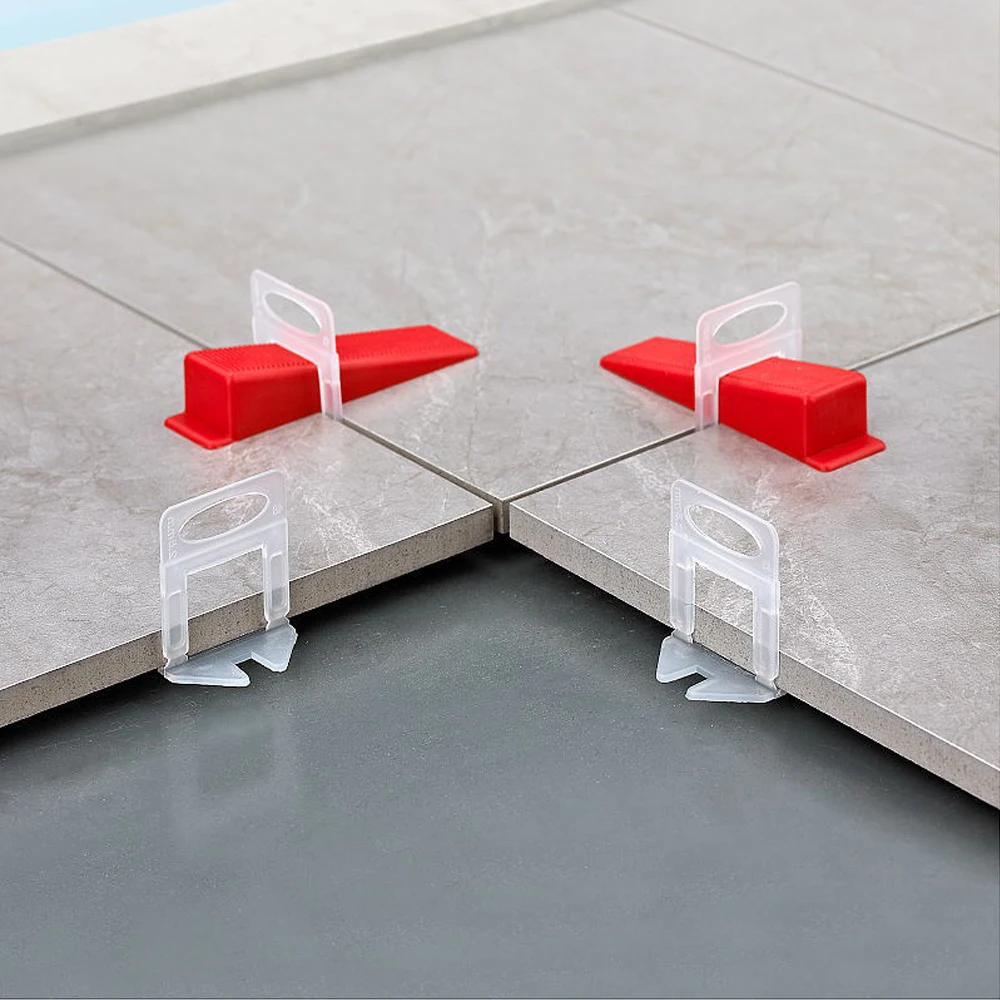
The wedge makes the two tiles flush against each other. When the tiles are set, you pull the wedge and break off the top of the plastic piece.
So update on this table. Since this was one of my first projects, I had limited tools and experience. I never glued anything and I didn't seal the underside of the table top. The breadboards stick out about an inch on each side and the middle planks are very cupped and warped.@AgronAlum This is my latest project. The middle planks of the table top must have shrunk because the breadboards on the end are now sticking out about an eighth of an inch on each side. Had them flush when I was staining it. Bench is fine though.
View attachment 68621
I am in the middle of redoing it. I found some really nice lumber at Menards if you can believe it. I ran all the boards through my table saw, which I didn't have back then, so they are all flush with each other and there are no grooves. I used glue this time. Filled in with wood filler where needed. I then sanded the hell out of it with my belt sander, which I should have done the first time. Now it looks like one solid piece of wood. Just have to put one or two more coats of poly on it yet.
The wedge makes the two tiles flush against each other. When the tiles are set, you pull the wedge and break off the top of the plastic piece.
Thank you!!
.
The wedge makes the two tiles flush against each other. When the tiles are set, you pull the wedge and break off the top of the plastic piece.
I've never incurred problems keeping things aligned tiling over a flat surface, wall or floor. I did work forever and a day tiling over a heated floor install in which the heating elements needed to be buried in mud and allowed to dry first but I don't believe these were available at the time--sure would have helped.
The wedge makes the two tiles flush against each other. When the tiles are set, you pull the wedge and break off the top of the plastic piece.
So update on this table. Since this was one of my first projects, I had limited tools and experience. I never glued anything and I didn't seal the underside of the table top. The breadboards stick out about an inch on each side and the middle planks are very cupped and warped.
I am in the middle of redoing it. I found some really nice lumber at Menards if you can believe it. I ran all the boards through my table saw, which I didn't have back then, so they are all flush with each other and there are no grooves. I used glue this time. Filled in with wood filler where needed. I then sanded the hell out of it with my belt sander, which I should have done the first time. Now it looks like one solid piece of wood. Just have to put one or two more coats of poly on it yet.
Made the mistake of not sealing the bottom early on as well. That and not leaving Menards wood sit and acclimate. I haven’t had as many issues with wood from other places. This hit me the biggest on the 4x4s on our fence.
The other thing i didn’t know early on was to alternate grain patterns with each board.
Should look like this
(
)
(
)
Not this
(
(
(
(
Thank you!!
They also come in different widths to act as spacers so it’s just getting that first row set.
When using them make sure you back butter your tile, and use a 3"8 trowel so you get a thick mortar bed. Levelers will lift tile off an uneven floor. Back buttering will keep good adhesion between tile and floor.Thank you!!
Menards wood takes freakin forever to acclimate. I almost always use it because I don’t feel I have enough skills to buy better stuff. It’s always cheap but man some of that stuff is like a god damn wet sponge.Made the mistake of not sealing the bottom early on as well. That and not leaving Menards wood sit and acclimate. I haven’t had as many issues with wood from other places. This hit me the biggest on the 4x4s on our fence.
The other thing i didn’t know early on was to alternate grain patterns with each board.
Should look like this
(
)
(
)
Not this
(
(
(
(
I don't know your level of expertise on this and it could certainly be above mine but I would guess the warping/cupping could occur on any board over 3 inches wide unless the grain is running near vertical. One solution to this would be to cut each plank in thirds and flip the middle one upside down. Also there is an art to attaching boards together when they are running perpendicular to each as with moisture changes they will expand more lengthwise than they will widthwise. At the very least let your lumber acclimate to the house conditions before assembly (two weeks?), but humidity changes summer to winter may still be a problem. Theoretically those end pieces need to "float" while still being firmly attached. Maybe google can helpSo update on this table. Since this was one of my first projects, I had limited tools and experience. I never glued anything and I didn't seal the underside of the table top. The breadboards stick out about an inch on each side and the middle planks are very cupped and warped.
I am in the middle of redoing it. I found some really nice lumber at Menards if you can believe it. I ran all the boards through my table saw, which I didn't have back then, so they are all flush with each other and there are no grooves. I used glue this time. Filled in with wood filler where needed. I then sanded the hell out of it with my belt sander, which I should have done the first time. Now it looks like one solid piece of wood. Just have to put one or two more coats of poly on it yet.
edit to say I misspoke. Wood expands more widthwise than lengthwise. In fact so much more that lengthwise expansion is rarely taken into consideration. If you are familiar with raised panel doors, they are built with tolerances between the panels and the stiles to account for movement. Also note that the panels are made of narrow strips to avoid cupping and are not glued to the stiles or rails but rather "free float" within the frame.
Menards wood takes freakin forever to acclimate. I almost always use it because I don’t feel I have enough skills to buy better stuff. It’s always cheap but man some of that stuff is like a god damn wet sponge.
Just personal experience but I’ve had infinitely better luck buying at Home Depot over menards when going to big box stores. The price has generally been near the same (sometimes cheaper) and you still get the 11% through Home Depot’s website.
Good tip. Problem for me is that Menards is closer and Home Depot is a pain in the ass to get to in comparison. Next time I’m doing a bigger project, I may check that out though.Just personal experience but I’ve had infinitely better luck buying at Home Depot over menards when going to big box stores. The price has generally been near the same (sometimes cheaper) and you still get the 11% through Home Depot’s website.
Good tip. Problem for me is that Menards is closer and Home Depot is a pain in the ass to get to in comparison. Next time I’m doing a bigger project, I may check that out though.
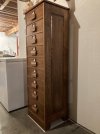
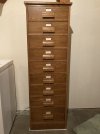
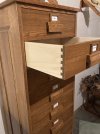
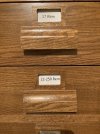
I have been an avid hunter all my life and reload all my own ammunition. I know, not popular with everybody but not making this political. I needed some way to organise everything so I built this chest of drawers. I was going for turn of the century postal or library motif so I made my own drawer pulls that hold a label card. Sides are raised panel and drawers are dovetailed
Attachments
the money saved also allows you to buy new tools and still save money!
This is always the big justification for me too. My wife for example got a quote to change her brakes/rotors/spark plugs/filters on her car and it was around 2k if I remember right. I think I was about $400 all in and got to buy a new torque wrench out of the deal. When I built the pergola I got myself a new battery powered nail gun, etc.
My biggest problem is time. My wife's "love language" is quality time and I work a lot. If I then spend all my free time on projects then that doesn't leave much for her. So I can afford to do a few projects a year but if I over spend my free time on said projects then I pay for it in other ways
")
I used to work in HVAC as a summer job while at ISU so I at least feel a bit comfortable in that area. Cars - I've done most of the work myself but it's an 8 year old 4Runner that has mostly mechanical everything. As we convert to more hybrid/electric I see that ratio of work I do on it being reduced. Accidentally puncturing a fuel/hydraulic line has slightly less consequences than shorting out a massive battery pack!I am the exact same way. I'm also extremely picky/perfectionist. My worry is always that I'll hire someone and I'll be upset with myself because A) it cost more than me doing it and B) it's not EXACTLY the way I wanted it.
That being said, as I get older and busier, I'm working on balancing what I want vs the realities of time. I've since abdicated any work on HVAC or cars. I've decided I'm going to pay for any of those services in order to "buy" myself more time to do the work I want to do which is woodworking and house DIY.
You have to be careful with those things though. If your floor isn't level you have to have a whole bunch of thinset laid down or you end up with voids and the tiles will crack. Before you use those it's a really good idea to poor some self leveling cement over the floor to get it flat to start with. Don't ask how I know..
I've never incurred problems keeping things aligned tiling over a flat surface, wall or floor. I did work forever and a day tiling over a heated floor install in which the heating elements needed to be buried in mud and allowed to dry first but I don't believe these were available at the time--sure would have helped.
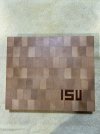
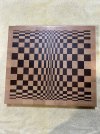
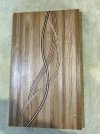
Somewhere along the way I read that as a “right of passage” to be labeled as a wood worker you have to have made a cutting board.
Funny because the one we use in the kitchen is nylon and the one in the basement kitchen where I clean fish is simply a 14” cutoff from a fir 2x12. I did try my hand at it though and managed these. Wether cutting a block of cheese, sliceing a canned ham or carving a turkey I should be fine.
Funny because the one we use in the kitchen is nylon and the one in the basement kitchen where I clean fish is simply a 14” cutoff from a fir 2x12. I did try my hand at it though and managed these. Wether cutting a block of cheese, sliceing a canned ham or carving a turkey I should be fine.